Removing and installing headlights
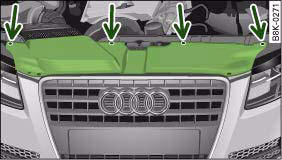
Fig. 246 Trim panel: Attachment points are marked by arrows
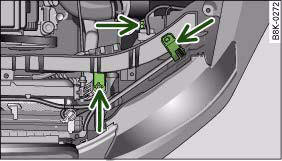
Fig. 247 Headlight unit: Attachment points are marked by arrows
The description for removing the headlight refers to the left headlight; in principle the same procedure applies to the right headlight.
Removing
– Switch off the ignition and the lights.
– Open the bonnet.
– Take the screwdriver and the interchangeable Torx socket
out of the vehicle tool kit.
– Remove the screws ⇒ fig. 246 that secure the trim panel
to the lock carrier and detach the trim panel.
– Slacken the two screws that secure the headlight to the
lock carrier and the screw at the underside of the headlight
(this screw is located between the cover and the
rubber cap and should not be slackened more than ten
turns) ⇒ fig. 247.
– Carefully pull the headlight forward about 60 mm.
– Release and unplug the electrical connector.
– Carefully take the headlight out towards the front (swivel
it slightly if necessary).
Installing
– Perform all of the above steps in reverse sequence.
The headlight must be inserted in two guides (on the underside of the headlight). This is the only way to ensure that the headlight is installed in the correct position. To determine whether the headlight is correctly installed, check that it is aligned flush with adjacent body parts (such as the wing panel).
Do not interchange the securing screws.
 Caution
Please take particular care not to damage or scratch the adjacent
parts of the body when removing or installing the headlights.