Parking parallel to the roadside
Parking mode 2 can be used when parking your vehicle at the roadside.
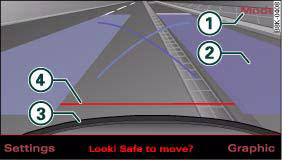
MMI display: Blue area marking aligned in parking space
MMI display: Blue marking touches edge of pavement
The following steps apply only when there are no obstacles (such as a wall) next to the parking space. Otherwise, please follow the “Instructions for parking next to obstacles”.
– Position your vehicle parallel to the roadside, about a metre away from the
next parked vehicle.
– Engage reverse gear. The parking aid will be switched on and parking mode 1 will
be displayed.
– Press the control button for Mode ⇒ fig. 194 1 on the MMI control console. Parking
mode 2 is displayed.
– Reverse and align your vehicle in such a way that the blue area marking 2 borders
onto the vehicle behind or onto the parking space line marking. The blue marking
is an extension of the vehicle outline and reaches about five metres to the rear
of the vehicle. The long side of the blue marking should border onto the kerb. The
complete blue area marking must fit into the parking space.
– When the vehicle is stationary turn the steering wheel to the left as far as it
will go.
– Reverse into the parking space.
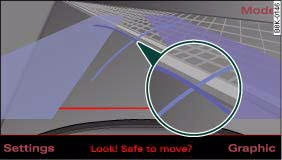
– Stop the vehicle as soon as the blue curve touches the kerb, fig. 195.
– When the vehicle is stationary turn the steering wheel to the right as far as
it will go.
– Continue to reverse into the parking space until the vehicle is standing parallel
to the kerb. 3 indicates the rear bumper. You should stop reversing, at the latest,
when the red orientation line 4 is bordering on an object ⇒
 ! Keep a close watch on the front of
your vehicle ⇒
! Keep a close watch on the front of
your vehicle ⇒  .
.
Parking next to obstacles
If an obstacle (such as a wall) is located next to the parking space, the clearance at the side of the vehicle must be larger. Position the long side of the blue marking so that there is sufficient clearance from the kerb. The marking must not touch the kerb. You must also start turning the steering wheel much earlier. The blue curve, fig. 195 must not touch the kerb - make sure there is sufficient clearance from the kerb.
![]() WARNING
WARNING
- • The reversing camera does not show the complete area behind the vehicle. It is particularly important to ensure that there are no small children or animals near the vehicle, as the reversing camera may not always be able to detect them (accident risk).
- • Please note that objects which are not touching the ground may appear to be further away than they actually are (e.g. the bumper of a parked vehicle, a towing bracket or the rear end of a truck). In this case you should not use the orientation lines as a guide when parking the car - accident risk!
![]() Caution
Caution
The MMI display shows the path of the rear end of the vehicle if you were to reverse using the current steering angle. NB: The front end of the vehicle swings out further than the rear. Please make sure you keep a sufficient distance between the vehicle and any obstacles to make sure that the exterior mirror or edge of the vehicle do not collide with the obstacle (accident risk).
![]() Note
Note
The orientation lines and markings appear on the left or right side, depending on which turn signals are on.